Introduction
Why Acoustic Foam Panels Matter
Whether you're setting up a recording studio, upgrading your home office, or trying to quiet a noisy living room, acoustic foam panels are one of the most effective and affordable tools to control sound. These lightweight panels are specifically designed to absorb echo, reduce reverberation, and enhance sound clarity in any space. But like any solution, they only work well when installed properly.
Poor placement or bad technique can result in minimal improvement—or worse, wasted time and money. This guide walks you through everything you need to know about acoustic foam installation, so you can get professional-level results with ease.
What You’ll Learn in This Guide
By the end of this article, you'll know:
-
What acoustic foam panels do
-
Where to use them for maximum impact
-
What tools and materials you need
-
How to install them step by step
-
Pro tips and common mistakes to avoid
Whether you're a DIY beginner or just need a refresher, we’ve got your soundproofing goals covered.
What Are Acoustic Foam Panels?
How They Work to Absorb Sound
Acoustic foam panels are made from open-cell polyurethane foam designed to trap and absorb sound waves. Instead of allowing sound to bounce off hard surfaces like walls or ceilings, foam panels capture those sound reflections and convert them into a small amount of heat through friction within the foam cells.
The result? A quieter, clearer space with reduced echo, less reverb, and improved speech or recording quality.
Common Types of Acoustic Foam Panels
There are several styles of foam panels, each with their own acoustic profile and visual appeal:
-
Wedge Panels: Most common, excellent for general sound control
-
Pyramid Panels: Offer multi-directional sound diffusion
-
Egg Crate Foam: Affordable and effective for basic needs
-
Bass Traps: Thicker, triangular foam placed in corners to absorb low frequencies
-
Flat Panels: Sleek and discreet, used in modern design settings
At Tempo Gear, you’ll find a great selection, including the 50x50x5cm Sound Proof Foam (10 Pack)—a popular go-to for both function and flexibility.
Where and When to Use Acoustic Foam
Ideal Rooms and Situations for Installation
Acoustic foam panels are incredibly versatile. You can use them in nearly any room where sound control is important. Top use cases include:
-
Home recording studios or music rooms
-
Gaming rooms and streaming setups
-
Podcast and voiceover booths
-
Home theatres and media rooms
-
Conference rooms and Zoom-friendly offices
-
Apartments or shared walls for sound privacy
In all these situations, acoustic foam improves both the quality of sound inside the room and limits noise leakage to nearby spaces.
Key Benefits for Home, Office, Studio, and More
Here’s what proper acoustic treatment can do for you:
-
Clearer audio for recording or conferencing
-
Less echo and background noise in music playback
-
Improved concentration in noisy workspaces
-
More privacy in apartments or offices
-
Enhanced overall sound quality for listening or talking
It’s not just about soundproofing—it’s about sound clarity, control, and comfort.
Tools & Materials You’ll Need
Mounting Methods (Adhesive Spray, Velcro, Strips, Glue)
Before diving into the actual installation, it’s important to gather the right tools and decide how you’ll attach the panels. There are several common mounting methods for acoustic foam panels, each with their pros and cons:
-
Adhesive Spray
-
Pros: Strong, fast, and easy to use
-
Cons: May damage walls or paint when removed
-
Best for permanent installations on smooth walls
-
-
Double-Sided Mounting Strips or Tape
-
Pros: Non-permanent and repositionable
-
Cons: May lose stickiness over time
-
Great for renters or trial setups
-
-
Velcro Strips
-
Pros: Reusable and easy to realign panels
-
Cons: May not hold up in humid conditions
-
Ideal for flexible positioning or temporary installs
-
-
Foam Panel Adhesive Glue
-
Pros: Reliable for rough surfaces like brick
-
Cons: Hard to remove without damage
-
Use when foam must stay up long-term
-
Choose the method that best matches your room type, wall material, and whether you’re renting or owning the space.
Additional Equipment: Tape Measure, Level, Pencil, etc.
To ensure your acoustic foam installation is clean, aligned, and effective, grab these basics:
-
Tape measure – for planning precise layout spacing
-
Level or laser line – to keep rows even
-
Pencil or chalk – for marking wall guidelines
-
Straight edge or ruler – to assist with neat placement
-
Step stool or ladder – if you’re placing panels high or on ceilings
Having everything ready beforehand will save time and prevent uneven or messy results.
Step-by-Step Acoustic Foam Installation Guide
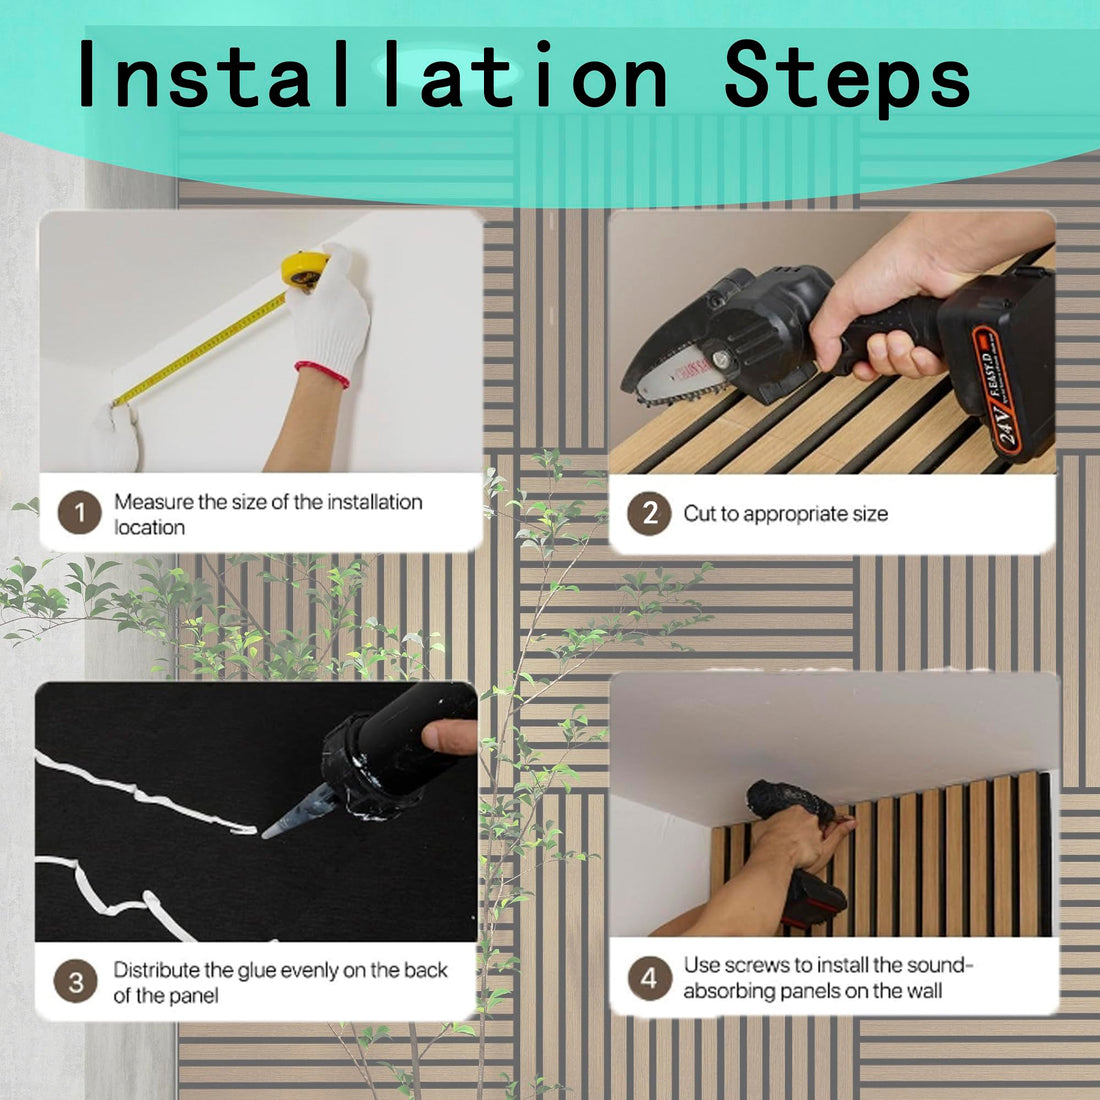
Step 1 – Plan Your Layout
Before sticking anything to the wall, take time to:
-
Measure your wall or ceiling area
-
Map out the panel layout on paper or digitally
-
Decide on spacing, pattern (grid or staggered), and key locations
Pro Tip: Start with first reflection points—these are spots where sound bounces directly from your speakers or voice toward the listener. Treating these areas first provides the most noticeable improvement.
Step 2 – Prepare the Surface
Clean the wall or ceiling surface with a dry cloth or mild cleaner. Ensure it’s dry, dust-free, and smooth—especially if you’re using adhesive methods.
On textured walls or bricks, foam-safe adhesive glue will adhere better than tapes or Velcro.
Step 3 – Apply the Mounting Solution
Follow these best practices based on your method:
-
Spray Adhesive: Spray the back of the foam and the wall. Wait a few seconds, then press firmly.
-
Mounting Strips/Tape: Place at least 4 strips per panel (one per corner), then peel and press.
-
Velcro: Stick one side to the panel and the other to the wall. Align and press.
-
Glue: Apply in an “X” or grid pattern for even hold, then press firmly.
Step 4 – Place the Panels
Working from bottom to top helps avoid misalignment. Use a level to ensure your first row is perfectly straight. From there:
-
Press each panel in place firmly for 30–60 seconds
-
Check spacing as you go to keep the look consistent
-
Adjust immediately if using removable methods
You can mix styles (e.g. wedge and pyramid) for a modern look—or stick to a uniform grid.
Step 5 – Final Adjustments and Finishing Touches
Step back and assess:
-
Are the panels level and evenly spaced?
-
Are key sound zones (like behind speakers or near mics) covered?
-
Do the panels look clean and cohesive with your room design?
Now your space should be not only better-sounding but also visually polished.
Tips for a More Effective Installation
Coverage Recommendations for Best Results
When it comes to acoustic foam, more isn’t always better—but strategic coverage is key. Here’s how to make your treatment as effective as possible:
-
Start with 20–30% coverage of your wall space for small rooms like offices or bedrooms
-
For studios or podcast spaces, go up to 40–60% coverage to reduce reverb and echoes
-
In larger or louder rooms, consider combining foam panels with bass traps and ceiling clouds
Prioritize areas where sound bounces most—such as parallel walls, ceilings, and corners.
Panel Placement Tricks (First Reflection Points, Corners, Ceiling)
To really level up your setup, consider these expert placement strategies:
-
First Reflection Points: Use a mirror to find where your speaker or voice reflects directly to your ears—treat those spots first
-
Corners: Add thicker foam or bass traps to control low-end frequencies and prevent muddy sound
-
Ceilings: Mount panels above speakers or the recording space to catch vertical sound waves
-
Back Wall: Place foam behind the listener or workstation to improve rear sound absorption
This isn’t just about aesthetics—it’s about targeted acoustic performance.
Common Mistakes to Avoid
Overuse or Underuse of Panels
Covering an entire room in foam may look intense—and it often is. Too much treatment can make a space sound “dead” or unnatural. On the flip side, using too few panels won't create any noticeable difference.
Solution: Start small, test the acoustics, and scale as needed.
Poor Surface Preparation
Trying to stick foam onto dusty or oily surfaces is one of the biggest reasons panels fall down.
Solution: Clean and dry your surface before installing anything—especially if you’re using spray adhesive or strips.
Not Measuring or Aligning Properly
Crooked panels or uneven spacing not only look messy—they reduce the effectiveness of your sound coverage.
Solution: Use a level, tape measure, and pencil to map your wall before starting. A few extra minutes of prep saves a lot of rework later.
Recommended Acoustic Foam Panels
Top Choice: Tempo Gear 50x50x5cm Sound Proof Foam (10 Pack)
Looking for a tried-and-tested panel that works for most installations? The Tempo Gear Sound Proof Foam 10 Pack is a popular choice. It offers:
-
Large surface coverage with 50x50cm dimensions
-
5cm thickness for superior sound absorption
-
Easy installation with adhesive compatibility
-
Multipack convenience for covering key zones quickly
Perfect for home studios, gaming rooms, and offices alike.
Explore the Full Collection
Check out the complete range of acoustic foam panels, bass traps, and bundles at Tempo Gear’s Acoustic Foam Collection to find a setup that fits your space, style, and sound goals.
Maintenance and Long-Term Use
Cleaning Your Acoustic Panels
Acoustic foam is low-maintenance, but occasional care helps keep it looking and performing its best:
-
Dust regularly with a vacuum and soft brush attachment
-
Spot clean with a damp cloth for minor smudges
-
Avoid using harsh cleaners or soaking the foam—moisture can damage the cell structure
In dusty or high-traffic environments like studios or offices, plan a quick clean every 1–2 months.
When to Replace or Reinstall Panels
Foam panels are durable, but not indestructible. Consider replacing or reinstalling panels if:
-
Edges start to curl or peel off
-
The foam becomes brittle or discolored over time
-
You renovate or rearrange your space and need new coverage
Also, if you change your room’s acoustics—like adding rugs, curtains, or new furniture—you may need to reassess your foam panel layout for continued effectiveness.
FAQs About Acoustic Foam Installation
Q1: Do acoustic foam panels block outside noise?
Not quite. Foam panels absorb internal sound reflections, but they don’t block external noise. For blocking sound, look into mass-loaded barriers or dense insulation.
Q2: Can I install foam panels on the ceiling?
Yes! Use strong adhesive spray or heavy-duty Velcro. Focus on areas above speakers, workstations, or the middle of the room to reduce vertical reverb.
Q3: How many panels do I need for a small room?
Start with around 20–30% wall coverage. For a 3x3m room, 8–12 panels (like the Tempo Gear 10 Pack) is a solid starting point.
Q4: What’s the difference between acoustic foam and soundproofing foam?
Acoustic foam absorbs sound reflections, improving clarity. Soundproofing materials block sound from entering or exiting. They serve different purposes but can be used together.
Q5: Will foam damage my walls when removed?
It depends on your mounting method. Adhesive spray and glue can pull paint or drywall. Use removable strips or Velcro if you're renting or want flexibility.
Conclusion: Soundproof Your Space with Confidence
Installing acoustic foam panels doesn’t have to be complicated—and the results are instantly rewarding. With the right plan, tools, and panel placement, you can transform any noisy or echo-prone space into a peaceful zone for work, play, or creativity.
From home studios and gaming rooms to office setups and content creation stations, acoustic foam gives you the control you need—without needing to tear down walls or break the bank.
Ready to get started? Try the reliable, easy-to-install Tempo Gear Sound Proof Foam 10 Pack or explore even more solutions in the acoustic foam collection.


