If you’ve ever watched a pro drummer play, you’ve probably noticed they make it look easy—fluid movements, perfect posture, and endless energy. But here's a little secret: that all starts with how they sit. Seriously. Your drum stool, also called a drum throne, isn’t just there to keep your butt off the floor—it’s the launchpad for every beat, fill, and groove you create.
Beginner drummers often focus on sticks and drums (understandably), but the way you sit can affect your posture, comfort, control, and even your speed. And here’s the good news—you don’t need to spend years figuring it out. With the right setup, you can start sitting like a pro from day one.
Whether you’re jamming at home, rehearsing with your school band, or setting up for a garage gig, this guide will walk you step-by-step through the perfect drum stool setup. We’ll help you find your sweet spot so you can play better, practice longer, and avoid the aches and pains that stop too many beginners in their tracks.
Let’s get into it.
Why Your Drum Stool Setup Matters
Comfort = Better Playing
Think of your drum stool like a car seat. If it’s too low, too high, or off-center, everything else suffers. Your legs have to work harder, your arms can’t reach smoothly, and your back starts to tighten up after just a few songs.
A proper setup gives you balance. Your hands and feet move freely. You stay relaxed and focused. That means you’re not just hitting notes—you’re making music.
For beginners especially, comfort leads to consistency. And consistency is how you get good, fast.
Injury Prevention Starts Here
Let’s get real—drumming is physical. Long practice sessions with bad posture can lead to back pain, wrist strain, or even long-term injuries. That’s not meant to scare you—it’s to highlight how important the right setup is.
Your drum throne supports your spine, aligns your hips, and takes pressure off your knees and ankles. Sitting correctly reduces tension, promotes better technique, and lets you play longer without pain.
Start with good habits now, and you’ll avoid years of physical therapy later. Trust us—your future self will thank you.
Pre-Setup Essentials
Choosing the Right Stool
Before you worry about how to sit, you need something solid to sit on. Not just any chair will do. A good drum throne is height-adjustable, stable, and padded just enough to support you without sinking.
Look for:
-
Height adjustability: So you can fine-tune your seat to match your body and your kit.
-
Sturdy legs: Usually a tripod base with non-slip rubber feet.
-
Comfortable cushion: Not too soft, not too hard—just enough to support your weight during long sessions.
Avoid using office chairs, kitchen stools, or folding seats. They’re not designed for drumming and can throw your posture way off.
Positioning Your Drum Kit First
Before you sit down and set your stool, take a minute to make sure your drum kit is positioned correctly. Why? Because your stool position depends on where your snare, pedals, and toms are.
Here’s a quick checklist:
-
Your bass drum should be directly in front of you.
-
Your hi-hat should be slightly to your left, within easy foot and stick reach.
-
Your snare should be low enough to play comfortably, but high enough to avoid wrist strain.
Set your kit first—then adjust your stool to fit you into that setup, not the other way around.
Step-by-Step Drum Stool Setup Guide
Step 1: Set the Right Height
Your seat height is the foundation of your posture. Here’s how to find your ideal setting:
-
Sit on your stool with both feet flat on the ground.
-
Your thighs should angle slightly downward (not flat or upward).
-
Your knees should be slightly lower than your hips.
This angle gives you optimal mobility for your legs and prevents tension in your lower back. If you’re too low, you’ll compress your hips. Too high, and your legs dangle or overextend.
Pro tip: Adjust your height incrementally. A half inch can make a big difference.
Step 2: Find the Right Distance
Your stool should be positioned far enough from the kit so your legs have space to move, but close enough that your arms aren’t reaching.
To check:
-
Sit and place your feet on your bass and hi-hat pedals.
-
Your legs should have a natural bend—about 90 to 110 degrees.
-
Your hands should comfortably reach your snare without locking your elbows.
If you’re stretching or leaning, move the stool a bit closer. If your knees feel cramped, back it up slightly.
Step 3: Check Your Foot Placement
Your feet are your anchors. For most standard setups:
-
Right foot goes on the bass drum pedal.
-
Left foot goes on the hi-hat pedal.
-
Feet should be shoulder-width apart, not too wide or too narrow.
Both heels should comfortably touch the floor (or pedal footboards), with your legs relaxed. This gives you control over your strokes without fatigue.
If one foot feels awkward, adjust your stool angle slightly—not just its distance.
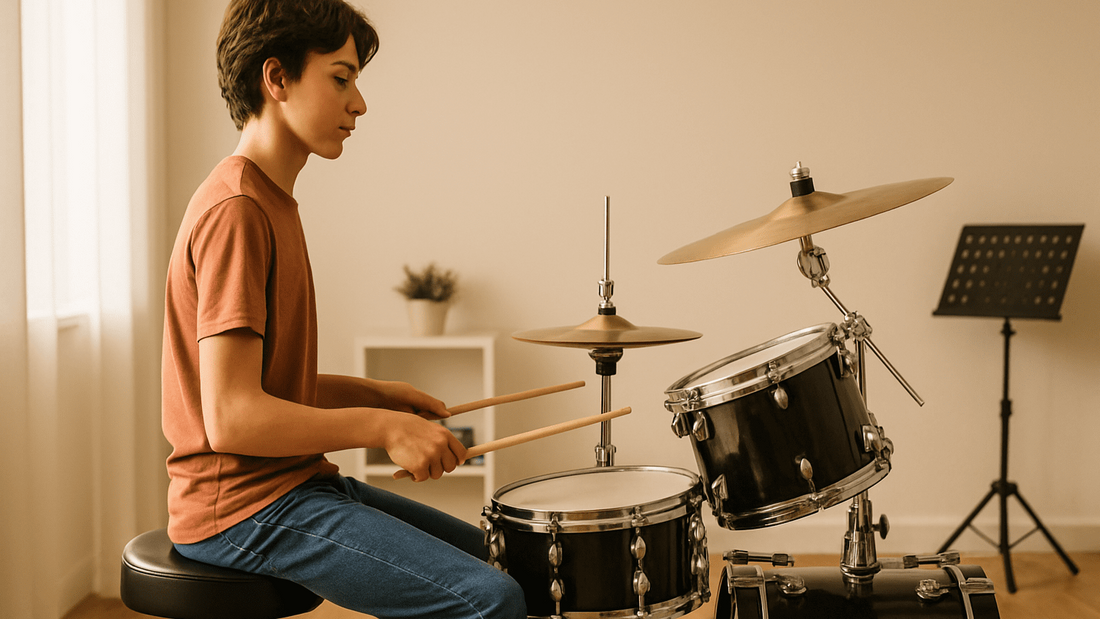
Step 4: Sit with the Right Posture
This is where it all comes together. Your back should be straight, but not stiff. Sit tall, with your chest slightly lifted and your shoulders relaxed.
Keep your:
-
Hips slightly above your knees
-
Spine in a natural curve (not slouched or arched)
-
Arms loose with elbows bent
-
Neck straight—not craning forward
Imagine someone gently pulling a string from the top of your head—that’s how your spine should feel. You’re not rigid—you’re centered and balanced.
Step 5: Lock In Your Position
Once everything feels right, double-check your stool height and make sure it’s securely locked in place. The last thing you want mid-fill is a sudden seat drop!
If your stool has a memory lock or height marker, use it. That way, you can easily return to your ideal height every time you sit down.
You’re now in position to play like a pro.
Visualizing the Perfect Drum Seat Setup
Basic Illustration Breakdown
Sometimes words can only go so far. Visualizing your drum stool setup makes it much easier to get things just right—especially when you’re still getting used to your kit.
Imagine a simple stick-figure-style drawing or photo showing:
-
The angle of your thighs: Slight downward slope from hips to knees.
-
Foot position: Right foot comfortably on the bass pedal, left foot on the hi-hat, both flat.
-
Back alignment: Straight spine, relaxed shoulders, neutral neck.
-
Arm position: Elbows slightly out, not tucked or flared, wrists relaxed.
A good visual cue helps you quickly self-correct your posture and position. If you're reading this online, pause and grab a mirror or record yourself playing. Compare what you see to these visuals. Are your hips higher than your knees? Are you leaning? Do your feet look natural on the pedals?
Simple diagrams or a quick video from your phone can be game-changers for beginner drummers figuring out their flow.
Posture Alignment from Head to Toe
Your posture isn’t just about your back—it’s a full-body alignment. Here’s how each part should look when you’re set up correctly:
-
Head: Balanced above your spine—not leaning forward. Chin parallel to the floor.
-
Shoulders: Down and back, not tense or raised. Let gravity relax them.
-
Arms: Bent about 90 degrees. Keep your wrists neutral, not bent up or down.
-
Back: Straight with a natural curve. No hunching or overly arching.
-
Hips: Square and centered. You should feel your weight equally balanced.
-
Thighs: Slightly sloped downward, never completely horizontal or vertical.
-
Knees: Over your ankles, not pushed forward or flared out.
-
Feet: Firmly planted on pedals with heel contact unless playing heel-up technique.
Checking each point creates a full-body setup that feels natural and allows freedom of movement. You’re not just sitting—you’re positioning your body to play.
Common Mistakes Beginners Make
Sitting Too Low or Too High
This is by far the most common error. New drummers often don’t realize that sitting too low can restrict leg motion, strain the hips, and make bass drum control clunky. On the flip side, sitting too high leads to bouncing knees, poor pedal feel, and instability.
How to know you’ve nailed it?
-
You feel planted.
-
Your thighs aren’t burning after a short session.
-
You can lift your feet quickly without lifting your entire leg.
If that’s not the case—readjust!
Leaning Too Far Forward
It might feel natural to hunch over your kit, especially when you’re trying to focus on your snare or toms. But over time, that forward lean creates tension in your neck and lower back.
Fix it by:
-
Sitting tall with your head in line with your spine.
-
Pulling your shoulders back gently.
-
Engaging your core to support your upright posture.
You should be close enough to the kit that you don’t have to lean to reach anything.
Using the Wrong Chair
We get it—it’s tempting to grab whatever’s nearby when you first start drumming. Office chair? Dining stool? Bean bag? All of them are a bad idea.
They’re either:
-
Not adjustable
-
Too soft or too stiff
-
Lack proper base support
-
Too unstable or high
Your playing posture is only as good as what you’re sitting on. Get yourself a real drum throne—it’s not a luxury; it’s a necessity.
Pro Tips to Improve Your Comfort
Use a Mirror or Record Yourself
This isn’t about vanity—it’s about awareness. When you record yourself or use a mirror, you get a different perspective. You’ll spot posture mistakes you don’t feel during playing—like leaning, slumping, or foot placement errors.
Use your phone’s camera to take short clips and review your setup. Over time, you’ll train your body to sit correctly without thinking.
Bonus: It’s also a great way to track your progress as a player!
Adjust as You Play—Not Just Before
Your first position might feel great during warm-up, but drumming is dynamic. If you start feeling tension or discomfort mid-session, pause and make adjustments.
Common in-session tweaks:
-
Raising or lowering your seat
-
Moving your stool a little closer or further from the kit
-
Adjusting snare or hi-hat height to reduce reach
There’s no shame in taking a second to reset your posture. In fact, that awareness is exactly what pros do to stay sharp and pain-free.
When to Re-Adjust Your Drum Stool
Growth Spurts (for Teens)
If you’re in your teens, your body’s changing fast. One month, your stool height might be perfect—and the next, your legs feel cramped. It’s totally normal.
Make it a habit to:
-
Re-check your seat height monthly.
-
Notice any new tightness or awkward movements.
-
Adjust your posture as your legs or torso grow.
A little tweak now saves a lot of frustration later.
Changing Drum Kits or Venues
Every kit is a bit different—height, layout, and pedal spacing vary between brands and models. So if you're practicing at home but playing at school or a friend’s house, expect to tweak your stool.
What to do:
-
Bring your own stool if possible.
-
Re-check your foot and snare distance.
-
Don’t assume “one setup fits all.”
A flexible mindset and a few quick adjustments can make any new kit feel like home.
Conclusion: Sit Like a Pro, Play Like a Pro
Your drum stool setup is more than a side detail—it’s the secret weapon behind every confident, consistent performance. Sitting right helps you play longer, sound better, and stay injury-free. Whether you’re jamming in your bedroom, rehearsing for a school concert, or laying down beats in a home studio, the way you position yourself matters.
By following these simple steps—choosing the right stool, setting the right height and distance, maintaining solid posture—you’re not just practicing… you’re building a rock-solid foundation for your drumming journey.
So sit proud. Sit steady. Sit like a pro—and let the rhythm flow.
FAQs
What’s the ideal angle for my thighs?
Your thighs should slope slightly downward from hips to knees—about a 10 to 15-degree angle. This keeps your back aligned and your legs free to move.
How far should I be from the snare drum?
You should be close enough that your elbows are naturally bent at about 90 degrees when hitting the snare—no reaching or locking arms.
Should my heels touch the ground when playing?
Yes, especially when using heel-down technique. If playing heel-up, the balls of your feet should remain on the pedals with full control.
Can posture affect my speed or stamina?
Absolutely. Poor posture increases tension and fatigue, reducing speed and stamina. Proper setup lets you play faster for longer with less strain.
How often should I check my stool height?
Check it monthly—or anytime you feel discomfort or change kits. If you’re growing or adjusting your setup, you may need to tweak it more often.


